First, you’ll select settings to render your movie in a quality suitable for broadcast.
- In the Project panel, select the Movement composition, and choose Composition > Add To Adobe Media Encoder Queue.
Tip
You can also drag a composition into the Render Queue panel, and click Queue in AME to add it to the Adobe Media Encoder queue.
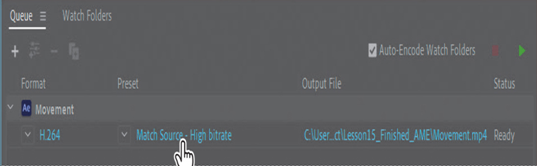
After Effects opens Adobe Media Encoder and adds your composition with default render settings. Your default settings may vary from ours.
- Click the blue link in the Preset column.
Tip
If you don’t need to change anything else in the Export Settings dialog box, you can change the preset using the Preset pop-up menu in the Queue panel.
Adobe Media Encoder connects to the Dynamic Link server, which may take a few moments.
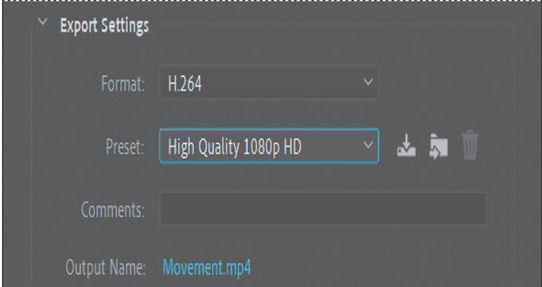
3. When the Export Settings dialog box appears, choose H.264 from the Format menu, and then choose High Quality 1080p HD from the Preset menu.
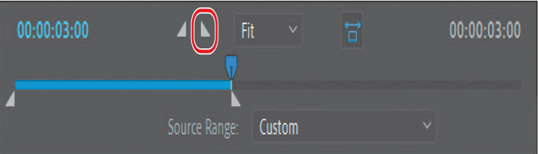
Rendering the full movie with the High Quality 1080p HD preset may take several minutes. You’ll change the settings to render only the first three seconds of the movie so that you can preview the quality. You can change the range rendered using the time ruler at the bottom of the Export Settings dialog box.
- Move the current-time indicator to 3:00, and then click the Set Out Point button ( ) to the left of the Select Zoom Level pop-up menu.
Tip
It’s easy to create an animated GIF from just about any short movie. Just add the composition to the Adobe Media Encoder queue, and choose Animated GIF for the format.
- Click OK to close the Export Settings dialog box.
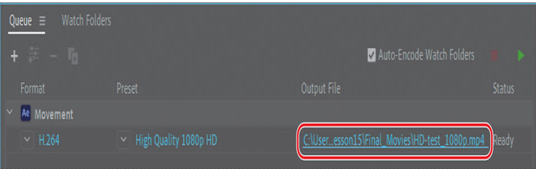
- Click the blue link in the Output File column. Name the movie HD-test_1080p.mp4, and specify the Lessons/Lesson15/Final_Movies folder. Then click Save or OK.
You’re ready to output this movie, but you’ll set up an additional movie option in the queue before you render it.